Monday, October 24, 2011

Cakey Affair - Bakes and Orders

I can't remember when was the first time I started baking a cake all by myself without the assistance from my mom or sis or aunt or grandmother, but I remembered once during a school holiday during my teens, I bought a chocolate cake mix with my cousin with hopes of  having our fresh from the oven cake. The cake mix only requires to add oil and egg, place it in a greased cake pan and bake it in the oven. The.cake.did.not.rise. I halted from baking after that, as I was in a boarding school for 2 years. 

Long story short, I still can't remember the starting point of my baking. I did bake blueberry muffins once in a while using Martha Stewarts' recipe somewhere in 2006 or 2007, but it all started at one point after my former housemate, Moodey brought her mom's oven to the house we used to live in Cyberjaya during our undergraduate student years. Thanks Moodey for the inspiration! I will always remember that. ^_^ 

This year has been the most baking work I've ever done in my entire life. I made some of the recipes for numerous number of times with lots of trials and errors (well that is what we have to do in order to get the best result aye?).... and I've started taking orders! 

Red Velvet Cupcake/Cake

Bakes


I was introduced with this cake by my sister earlier this year. At that moment, my sister was pregnant, she recently got back after a good 3 years of working in London, and was unemployed since no companies would want to hire a pregnant lady :p. She said she made the best red velvet cupcakes ever, and her cupcakes were a hit back in London when she had this charity sales or something. 

Our first trial was a disaster. I guess it was due to the ingredients. Previously, all of our ingredients especially those baking ingredients would somehow pass the due date. I was a seasonal baker, and there would always be leftovers of the ingredients which will be kept for months before the next baking project. The ingredients we used for the first trial have yet to reach the expiry date, but since it was kept in the refrigerator so long, the stuff kinda absorbed the smell of the fridge, or as we call it "bau peti sejuk". We used icing sugar which was kept for 2 months or so, and our cream cheese frosting tasted "peti sejuk"!  

All of that were history. Hehe. After cupcakes, I tried making a whole cake, and it was a success. I've altered the original recipe by reducing the sugar amount and adding a very secret ingredient. Haha. I am still in the quest of searching for the best cream cheese frosting which will be easy to pipe and won't melt easily and most importantly, not too sweet. Most recipes will just ask to add more sugar to make it stiffer. 

Orders

These are some of the orders I've made so far.. My very first customer was my former schoolmate, Amin who requested 2 cakes for his sister's engagement.


And a few other orders, which basically are from my family and some close friends who've tried it during my Open House last Syawal.


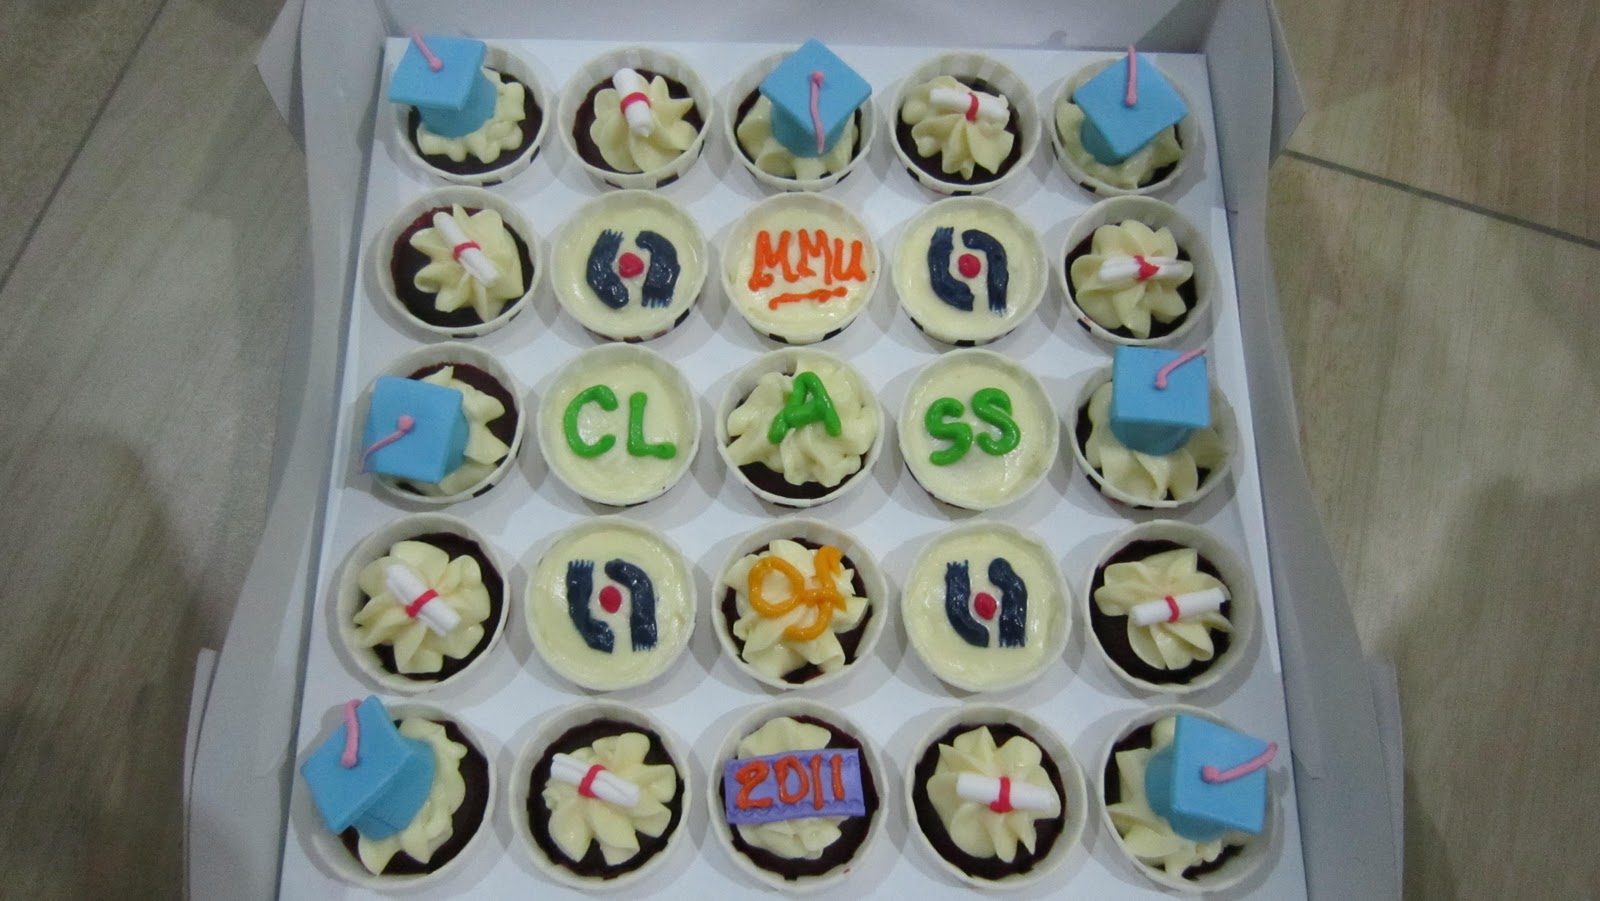
And thanks to my friend, Mawaddah who have yet to try my red velvet, but she promoted me to her  officemate for  graduation themed cupcakes. This was my first time working with fondant though. It was a hard work!! 


I also  made a few extras for a friend who's leaving on a jet plane...

and a dear friend's graduation.


Rainbow Cake

Bakes


My first encounter of Rainbow Cake would be during a friend's wedding weeks before Ramadhan. I really like the idea of Rainbow Cake, it was colourful and would cheer anybody's day. I wasn't really interested of making one, not until my sister BBMed me another rainbow cake made by her friend's sister whilst she was having breakfast at her friend's place. I just realized that making rainbow cake is not that difficult, I just need to find a good pound cake recipe, or butter cake recipe, or any vanilla cake recipe and add colours to them. The only hassle is the need of baking it layer by layer. I tried my first Rainbow Cake during Open House last Syawal as well.. 

Orders

A friend's friend saw the above photo and decided to order one from me as well. I'm not sure if she liked the cake or not, but hopefully she liked it. :-S. The white frosting is cream cheese frosting! 


The Best Chocolate Cake You've Ever Ate

Bakes


I remembered the first time I made this cake somewhere in early 2010 for a friend's birthday, I followed the exact same recipe as the one here. The recipe was supposed for a 9x13 inch pan but I made it in a 8 inch round pan. It should be good on it's own, but I decided to cut the cake to half so that I can add the chocolate frosting in between. The cake was a very dense cake, hence upon cutting it in between it collapsed. I managed to save it by adding frosting in between and tried to put the cake to it's place and make it back to a rounded shape and add frosting on top of it. My friends actually liked the cake and they can't believe I actually baked it myself. :p

It was long after that I tried making the recipe again around this year, but this time around I changed the method, instead of using melted butter, I creamed the butter with reduced sugar. It was a hit! I made it for my nephew's Akikah, and most of the guests loved it! It was in bite sizes hence the love affair by the guests. The cake was very soft after baking though, so I had to make it to bite sizes and had to present it as the above picture so that it'll look presentable. It would very difficult to make the cake in one piece, because as I turned it over it would break! :-S. I prefer to bake this during big events as it can cater for quite a number of guests.


Ah, I guess that's all for my cakey affair.. I have yet to try more recipes, but for now I guess I'll stick to these few.. My next trial project would be Lemon Poppy Seed Cupcakes. Can't wait!!


Friday, October 21, 2011

Yeasty Affair 2 - Ensaimadas de Mallorca

Previously we were in France, now let's fly to Majorca Island in Spain to try their yummy breakfast treats. Spiral bread!!


Anyways, Ayah gave me a 1 foot tile for me to work with my dough. I initially wanted to just use the existing table top but it was hard to clean it up before working the dough and after work (It will need at least 3 times of wiping for the before work : one with soap, the next few times with kitchen towel + water, and the next one with a dry kitchen towel and another 3 times for cleanup! OMG). Mak asked me to cover the table top with huge clear plastic while I knead the dough but I find it cumbersome as the plastic tends to stick on the dough. I am quite happy with this tile.This was actually remnants of the tile we used for a different part of the kitchen when it was in renovation earlier this year.


Anyways, back to Ensaimadas. The word "saim" actually originated from light pork lard. Better be careful when u see this bread while in Majorca or anywhere else. They might contain lard....

As for this recipe, the book only says use butter. The lard was actually used for the glazing. The bread itself uses only sunflower oil. Okay let's get to the recipe..

Ingredients

225 g white bread  flour (I just used Tepung Gandum Cap Sauh, my faveret!)
1/2 tsp salt
50 g caster sugar
15 g fresh yeast (I used 1 packet mauripan dry yeast, 11 g)
75 ml lukewarm milk
1 egg
30ml/2 tbsp sunflower oil
50 g butter, melted
Icing sugar for dusting

1. This time around, I made the dough for the first rising the night before so that I wont be in a rush to prepare every thing in one morning. Sift the flour, salt and caster sugar together and then make a well in the centre. 


2. Cream the yeast with the milk. Pour into the centre of the flour mixture and then sprinkle a little of the flour over the top of the liquid. Leave in a warm place for about 15 minutes or until frothy. 

3. Beat the egg and sunflower oil together, add to the flour mixture and mix to a smooth dough. 

4. Turn out on to a lightly floured surface and knead for 8-10 minutes until smooth and elastic. This time around I still use the electric mixer for the kneading, the same method like the previous entry. Place in a lightly oiled bowl, cover with cling film and leave in a warm place for an hour or until doubled in bulk. (Since I prepared the dough the night before, I left it in a refrigerator for about 8 hours so that it will rise slowly overnight and doubled the size by the next morning.)

5. Turn out the dough on floured surface and knock it back. (My dough for the first rising was cold, so I had wait till it became to room temperature before knocking it back). Then, divide the dough into 16 equal pieces, and shape them into thin ropes around 38cm/15in long.

I asked my 7 years old nephew to capture the picture, hence the lower eye view hehe. And look at the brown tile I use for my bread making! Lovin it.

6. Pour the melted butter onto a plate and dip the ropes into the butter to coat.

 7. On the baking sheets, curl each rope into a loose spiral, spacing them well apart. Tuck the ends under to seal. Cover with lightly oiled cling film and leave to rise in a warm place for around 45 minutes until doubled in size. 
8. Preheat the oven to 190 degrees C / 170 degrees C fan assisted. Brush the rolls with water and dust with icing sugar. Bake for 10 minutes or until light golden brown. Cool on a wire rack. Dust again with icing sugar and serve warm.


Thursday, October 20, 2011

Yeasty Affair 1 - Petits Pains au Lait


Petits Pains au Lait.. when translated with Google Translate will just result as... bun. Yes, just bun. Haha.. The exact meaning is small milk bread, or as they said it in the book, French milk rolls! Yummehh..

It tasted good, as the bread is rich with milk, soften butter, and more milk for glazing. 

I just realized that the recipe calls for 200 degree C for baking, and that actually made the outer part crispy while maintaining the softness inside. Previously I made cinnamon rolls and the bread was quite pliant. Mak wants me to use this milk roll recipe for the next batch of cinnamon rolls! Wah I can't wait to try. It must be really goooood.


Ingredients

450 g wheat flour
2 tsp salt 
1 tbsp caster sugar
50 g butter, softened
15 g dried or fresh yeast ( I used 1 packet of mauripan yeast, 11g)
275 ml or generous 1 cup of lukewarm milk, plus 15ml for glazing


1. Sift wheat flour with salt. Stir in the sugar, and then rub in the softened butter into the flour mixture.

2. Cream yeast with 4 tablespoon of milk (60ml). Stir in the remaining milk and then pour into the dough to form a soft dough.

3. The original recipe calls for transferring the soft dough on a lightly floured surface and knead until elastic and smooth. At this point, I transferred the soft dough to my electric stand mixture and using a dough hook, knead the dough until elastic. Once you see the gluten develops, remove from the bowl and I just knead it using my hand for around one minute.

4. Place in an oiled bowl, cover with a lightly oiled clear film and leave to rise, in a warm place for until doubled in bulk. I left for around half and hour, but I think at that time it didn't rise enough, so it is better to leave for 1 to 1 1/2 hours.

5. When the dough is ready, knock down the dough to remove air and then divide the dough to 12, forming small balls and place them on a greased baking tray.

6. Cut a + on the middle of the dough and let them for a second rising for about 20 minutes. I actually left it a little longer and the cross shape was gone and it turned out to be spikey buns instead :p.


7. Brush the rolls with milk and  bake on a preheated oven of 200 degree C for 25 minutes of until golden. This baking time seriously depends on your oven so do check your baked goods at around 10 minutes. I think my cooking time was just around 13 minutes.

Best served warm.. Heat them again in the microwave for 15 seconds if u want to consume them again later of the day..


Tuesday, October 18, 2011

Uh Hello!!

Uh Hello!!!

I just feel like I need to have one online kitchen journal.. before I actually write them down on my offline journal. heh. 


I just bought this book from Big Bad Wolf booksale. It was a very good deal, I mean all of the books from Bid Bad Wolf were in a very good deal, so I grabbed one of this, and a lot of cookbooks. Yes, I mean a lot of cookbooks!!! 

This kitchen manual contains lots of interesting things like conversion of cups to ounce to grams for some ingredients, which I always need to refer to whenever I used American or British recipes. You see, American recipes used butter in cups and sticks where butters sold in Malaysia are mostly in 250 grams or 227 grams (8 ounces). I will always need to convert the butter amount from cups to gram. My baking started off with using cups for flour but since we had the digital weighing scale at home, I trusted the weighed flour more than cups measured, so sometimes I would like to see how one cup of flour weighed. 

There are a lot of other things included in this book as well, like chicken and beef blueprint, liquer substitution etc, and most importantly, there are recipe slots as well!! I've decided to put only the best recipes in here.. So this is going to be my masterpiece cookbook! Hehe.

Anyways, back to Big Bad Wolf, my mother bought quite a number of them too, and my sister as well. Oh no we really have lots of recipes to try out - from Mediterranean foods, Italian, French, Asian... and my current obsession currently is of breads... 


I'll post up some recipes and perhaps some self discovered tips (which might be wrong, but nevermind!) in the next posts.. Till we meet again!